Home > Help Guides > Server Network Configuration Guide
Server Network Configuration Guide
An IP address is a unique way of assigning any device to your network. Every device on your network must have one and just like a home phone number, the IP address must be unique for every device on your network. Sometimes your router will pick the addressing information for you, this is call DHCP, and sometimes you will need to assign a specific IP address manually that will never change unless you go into the device and change it yourself. This is called assigning an IP address statically.
| Checking Router DHCP Range | ||
| Most routers have a specific range of addresses (which can usually be set by the administrator) that it will use to assign to devices on the network. When assigning the ReQuest server an IP address, choose an address outside if this range. | ||
 | In Linksys routers, there is often a
"Basic Setup" page. The Starting IP address can be set, as well as the
maximum. The router will assign address beginning at the starting
address. Addresses between (192.168.1.2 - 192.168.1.99) or (192.168.1.151 - 192.168.1.254) would be good static IP values in this example. | |
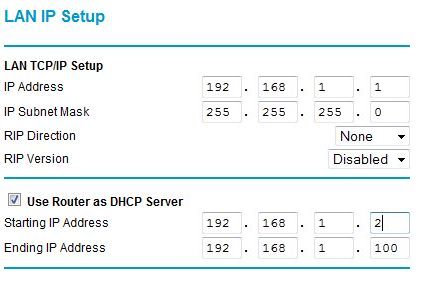 | NetGear routers typically have a "LAN IP Setup" page that allows the starting and ending IP range to be set. Addresses between (192.168.1.101 - 192.168.1.254) would be good static IP values in this example. | |
Establishing IP information for the ReQuest Server | ||
| There are a few different ways to figure
out on your own which IP address will work but the easiest way is to
see what settings your computer is using. If you are using a Windows
OS based PC, here is the easiest way to find the networking information. | ||
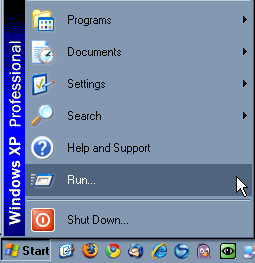 | Click on the “Start” button and then click on “Run…” | |
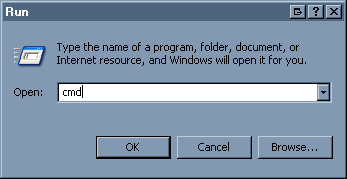 | The Run dialog box will pop up. Type in cmd & click on the “OK” button. | |
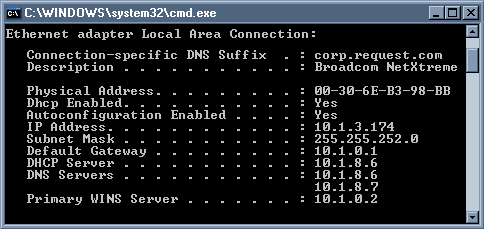
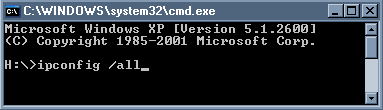 | A black window will pop up. In the picture below I get the prompt with a drive letter. Type in ipconfig /all and press enter. | |
| Scroll down to the Ethernet adaptor Local Area Connection
section. In our example, the IP address is computer is 10.1.3.174. In
most home installations, the common IP scheme is 192.168.1.x or
192.168.0.x. The only important thing is that you assign an IP address
that will work for your router and your network. For our network we
know that we need to assign an IP address of 10.1.3.x and that we
should only change the very last number. | ||
 | ||
| Establishing the Server IP Address Your router has a set amount of IP addresses it considers part of its DHCP pool. These are the numbers it will try to assign automatically to any device you plug into the network. You want to try and assign an address that is outside of this range. Since my PC was assigned 10.1.2.35, I can assume that the DHCP range goes between 10.1.2.1 – 10.1.2.99. To be safe, I would assign my ReQuest device an IP address of 10.1.2.150 or higher. Likewise if I found my computer to have the IP address of 10.1.2.100, to be safe, I would assign my ReQuest device an IP address of 10.1.2.50 or lower. Just do not assign an IP any higher then .254. Based on this analysis, make note of what IP you would like to assign the server. Establishing the Server Subnet Mask, Gateway These numbers should be exactly the same as on your ReQuest device and your computer. Since my computer has a subnet of 255.255.252.0 and a gateway address of 10.1.0.1, I will assign these exact same numbers to my ReQuest unit. Based on this analysis, make note of what Subnet and Gateway you should assign the server. Note: The gateway address is the IP address of your router since your router acts as your gateway to the outside world. Establishing the Server DNS Address The DNS address is how your PC and you ReQuest device get out onto the internet and the outside world. It is very much like having to dial ‘9’ from your office phone before you dial an outside number. My computer has 2 options, 10.1.8.6 & 10.1.8.7 so I can try to use either of these for the DNS on my ReQuest unit. Sometimes a DNS address will expire, so it is possible that I will have to try both of them before I find one that works. Based on this analysis, make note of what DNS you should assign the server. Frequently there will be only one DNS number listed for your computer and it will be the same as your gateway. This means that anytime your ReQuest device tries to get out onto the internet, it will refer back to your gateway (aka your router) for the proper information to get out. This works well for many routers but not all. Note: There is also a public DNS address that you can try. It should work with any network. This DNS address is 208.67.222.222. If you have any trouble using the same DNS addresses as your computer is using, try rebooting your router by unplugging it and then plugging it back in again. Then reboot your ReQuest server and try again. | ||
 | Finally, you need to test if the IP chosen is not already taken. On the prompt below the IP information, type in ping <selected IP address> and press enter. If the Request timed out, the IP address is available for use. | |
See also
NAS Guide
Web Camera Guide
Using the Legacy Interactive Remote
Backing up and Restoring Playlists
Finding Custom Streaming Radio Stations
How to verify Blu Ray ISO file
How to Port Forward
How to Run a Software Update
NetSync Configuration Instructions
Bandwidth Usage
Keyboard Shortcuts
How to find the MAC Address of a Computer
How to Calibrate ReQuest Touch Screens
Advanced Web Server Editing w/ Foxreplace
Configuring Lutron Lighting Control