Home > Manuals > Legacy Products > F.Series Media Servers > Installing the F.Series
Installing the F.Series
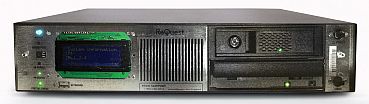
| Front of F.Series V5 | ||
| ||
 | Power Light - Illuminates blue when the server is turned on. | |
| | IR Window - Location where infrared signals are received. | |
| | Status Light
| |
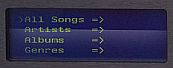 | LCD Display - Used for conveniently displaying configuration menu and browsing/playing music when looking at the front of the ReQuest server. | |
| | Front Power Button - Turn the server on/off. The Rear Power Switch located on the back of the chassis must also be switched to the on position for the ReQuest server to power on. | |
| | CD/DVD ROM Drive - Used for archiving music CD's and Movie DVD's (for systems equipped with ReQuest Intelligent Media Client). | |
| | Eject Button - Ejects CD/DVD ROM Drive. This will not function while the Status Light pulses green-red. | |
| | Thumb Screws - Used to remove or secure the faceplate of the server. | |

| Behind the Faceplate of F.Series V5 | ||
| ||
| | IR Enable - Turns the front IR receiver on/off. | |
| | IR Status - Illuminates green when front IR receiver is turned on. | |
| | USB Keyboard Port - Additional USB port convenient for connecting a keyboard to the front of the server. | |
| | Hard Drive - SATA Hard drive that contains Serious Play Operating System and storage for music/movies. Drive must be inserted for F.Series to start up. | |
| | CD/DVD Activity Light - Located underneath CD/DVD drive, the activity light illuminates green when CD/DVD is in use. | |
| | CD/DVD Manual Eject Button - Also located underneath the CD/DVD drive tray, this will eject the CD/DVD tray even if the ReQuest server hasn't completely started up. | |
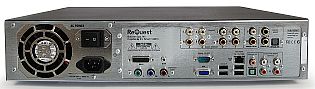
| Back of F.Series V5 | ||
| ||
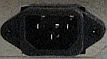 | AC Power Connector - Connect to either 110 volt or 220 volt. The ReQuest server will automatically detect and switch between 110 or 220 volt power systems. | |
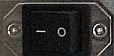 | Rear Power Switch - Flip to the - position to enable power, O to disable. | |
| | DVI Port - Displays Graphical User Interface (GUI) for the ReQuest server. Connect to a TV or video distribution system that uses DVI. | |
| | Component Video - Displays Graphical User Interface (GUI) for the ReQuest server. Connect to a TV or video distribution that uses component video (480i). | |
 | VGA - Displays Graphical User Interface (GUI) for the ReQuest server. Connect to a TV or video distribution that uses VGA. | |
| | Serial - Used for home automation systems that can be programmed to control the ReQuest server via RS232 Serial. | |
 | IR - To extend the range of infrared control, third party IR receivers can be connected to the ReQuest server. | |
 | Ethernet Port - Connects the ReQuest server to the local network and Internet. Capable of 10Mbps/100Mbps/1000Mbps. | |
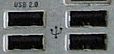 | USB Ports - Used for connecting a ReQuest TS.15 touch screen or USB keyboard | |
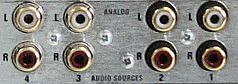 | Analog Audio - Analog audio connectors for each zone of the F.Series. F4 servers have four zones of audio, F2 servers have two zones of audio. | |
 | Digital Audio - The Optical and Coaxial connectors for digital audio to the right of the Analog Audio connectors are active. The digital output is always the same as the first analog audio output. | |
 | Unused Connectors - The connectors for Digital Audio In, Streaming Audio, and the second set of Digital Audio outputs are not currently used or working. | |
| Installation Steps |
|
See also