Home > Help Guides > NAS Guide > WD ShareSpace NAS Set-Up
WD ShareSpace NAS Set-Up
Use this user supplied guide to set-up a WD ShareSpace Drive. This has been tested by a third party and has been supplied on the ReQuest support site to help others with this hardware. We do not officially recommend this device as it has not been tested in house.
Overview |
||
Test Environment:
|
||
Setup Overview:Once the WD Sharespace has gone through its basic configuration via the WD install disk, you will need to log into it to change some settings and configure a public share to store the Request Media Files. In a nutshell, what you want to do is set the NAS on the network on a static IP address so you can easily point the ReQuest to it so it can recognize it. The ReQuest will not find it or its shares if you use the “Locate xxxx” links on the NAS Storage page in Settings. You will now go through the steps for each of these tasks. |
Setup |
||
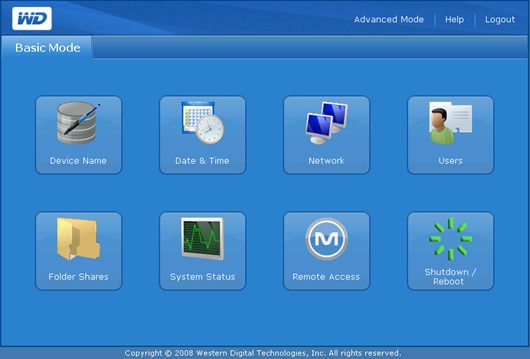 |
Log into the WD ShareSpace via the WD software. It will default to the Basic Mode home page. |
|
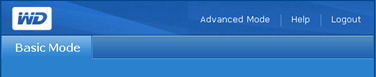 |
Switch to Advanced Mode by clicking the link at the top right of the page. | |
 |
Select the Network Tab |
|
 | Select the LAN button. | |
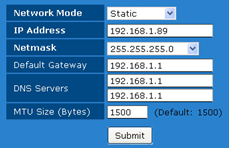 | Here you will set-up the NAS device to have a Static IP address. See our network configuration guide for assistance in determining a proper Static IP for this network. | |
 | Press the Submit button. The NAS will reboot. | |
| Log back into the WD ShareSpace via the WD software using the new IP address of the NAS and select Advanced Mode. | |
 | Select the Storage Tab | |
 | Select the Folder Shares button. | |
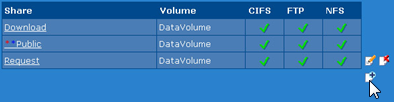 | This page shows all the shares on the NAS and its associated access protocols. The WD ShareSpace ships with a Download and Public share as default shares. To add a new share, click on the small icon with the + sign in it. | |
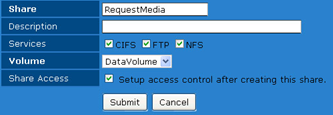 | On this screen, enter the name of the new share (description optional) and check all the access protocols (This is important as the ReQuest needs CIFS in order to communication to the NAS). | |
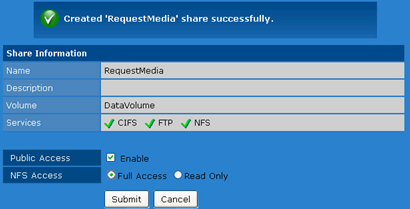 | The screen will change to the new share under the Folder Share Permissions section. Enable Public Access and under NFS Access, check mark Full Access. Select Submit. | |
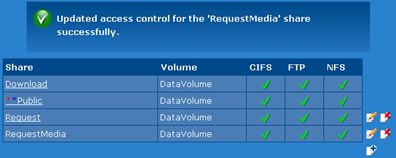 | If entered correctly, you will now see a screen with an update successful message and the new share listed in the Folders Shares list. | |
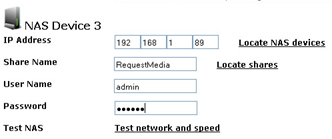 | Follow our NAS Guide to set-up this NAS device to communicate with the ReQuest server. Please note that the NAS is not detected automatically on the network and information will be need to be added manually. Also, add the user name and password used to log into the WD ShareSpace via the WD software. | |
See also